iOS vs. Android Development Comparison – Part 2
Author: Lubos Mikusiak
![]()
![]() ,
March 2013
,
March 2013
This is the second part of the article discussing the differences between iOS and Android from developer's perspective. Part 1 was rather high level. In part 2 you will learn what you can expect when you decide to get your hands dirty with development and try to publish your apps.
Styling and Theming
Both platforms support both basic methods of creating UI:
- Have a separate layout file that the platform loads and displays. The app needs to create bindings between the loaded UI elements and its controller code, such as button click handlers.
- The layout file is empty or non-existent and the app builds the UI programmatically.
The rest of this section covers the first option of building the UI.
Beautifying the Apples
Layout and appearance of UI elements in iOS is described in XIB files, which have proprietary Apple format. The layout, the alignment elements and appearance attributes (color, width, height, font style, etc.) are stored in one file. There is no inheritance. So if your app is almost ready and you decide to change the background of all views from ocean blue to pistachio green, you would have to revisit every XIB file (usually one per view) and change the background color attribute. The alternative is to set some appearance attributes programmatically. Write a base class for all view controllers or a utility function that sets some appearance attributes of view elements, i.e. overwrites attributes retrieved from the XIB files.
Embellishing the Droids
The layout and the appearance of UI elements is partially separated. Layout is specified in XML files – usually one XML per view (it got slightly more convoluted with fragments). The appearance is specified in themes and styles, although layout files can specify/override the appearance too.
Android has a notion of a theme. A theme is a collection of predefined styles (e.g. button backgrounds) and attributes (such as colors and text sizes). If a theme is applied to an app, the UI elements get the appearance based on the theme. You can diverge from a theme by creating styles in your app. Styles are named collections of appearance attributes (color, font style, padding etc.). Styles can be assigned to individual UI elements in the layout files. The styles can be defined either from scratch or be derived from other styles or be derived from the styles in the theme. When defining the styling of areas, you have two options. Either you define how the area is rendered using vector graphics or using 9-patch files (rater format). Read Styles and Themes for more details.
Overall, the styling and theming options are very extensive. One issue I found was that when going with styling too far, I ended up with too many small XML files and it was hard to keep overview what is defined where.
Navigation
iOS
iOS is very non-prescriptive when it comes to navigation. Developers decide how users will navigate in the app. There are standard UI elements, such as tab bars and navigation bars. If the standard navigation elements are used the navigation is hierarchical (e.g. from list to detail; from the detail back to the list, etc.). This is usually sufficient and easy to get used to.
Sometimes I wish there was a Back button. This happens when one app invokes another app and I want to go back to the first app. Without the Back button, I need to press the Home button to exit the second app, then find the icon of the first app on the home screen and tap it to activate the first app again.
Android
While Android usually offers multiple options in the implementation, navigation is an exception. Google tries to standardize the navigation and make it consistent between apps. This is needed because apps can interact with each other, e.g. one app can display a view from another app.
Before Android 3.0, devices had four standard hardware buttons:
- Back button – takes the user to the previous step
- Menu button – shows less important menu options, which normally do not fit on the screen
- Home button – takes the user to the home screen
- Search button

Android 3.0 and higher introduced a virtual navigation bar with Home, Back and Recents button.

The Search and Menu buttons are displayed in the action bar. This is not done automatically. Apps need to add these buttons programmatically.

Various options in the navigation make it sometimes more confusing for the user rather than making his life easier. There are subtle differences between Home and Back buttons, which many users do not quite understand. There is also an Up button in the action bar (the one with arrow pointing to the left).

Android documentation tries to explain the nuances in navigation in articles:
If you are not familiar with those documents, try to read some of them and decide for yourself whether things could be more simple and intuitive.
If you want your apps run on Android 2.x, 3.x and 4.x, you will have to test the navigation carefully on each of those versions. It is very likely that some parts of navigation code will have to be implemented separately for each major release.
Open vs. Closed
Android
Android
Android is more open than iOS. Android apps can publish data, which other apps can consume. For example, call history is available to all apps. Apps can also broadcast notifications and other apps can subscribe to them. For example, any app can subscribe to notifications about status changes of outgoing and incoming calls. Apps can also invoke functionality from other apps. Sharing content via email or social media is a good example. It is a standard action in Android API that can be invoked with just few lines of code.
iOS
iOS is restrictive in many ways. The apps are sand-boxed and there are very limited possibilities to communicate with each other. Essentially, the only allowed interaction is that app A can invoke app B using the URL scheme that app B published. For example, the URL scheme registered by the App Store app is itms://. Using this scheme, any app can invoke App Store and make it to display the page for a specific content.
If you develop on iOS, you will come across limitations once in a while and wish that iOS was more open in order to implement some very useful functionality in your app. There are certain things you can achieve using only private APIs. However, an app that uses private API(s) would be rejected automatically while uploading it for approval.
Certificates and Signing
Android
All apps, which run on Android devices, have to be signed with a certificate identifying the author of the app. However, you might get very far without generating a single certificate. While in the debug mode, the build tools sign the app with a debug certificate. You will need to create your own certificate only before uploading your app to Google Play Store or before doing an ad-hoc distribution. A self-signed certificate is sufficient. Android uses the certificate as a means of identifying the author of an application and establishing trust relationships between applications. The signing procedure is described in Signing Your Applications.
iOS
The situation is very different on iOS. You need a certificate from Apple even to install an app on your own device. In order to understand the signing, you will have to get familiar with terms like bundle identifiers, provisioning profiles, App IDs and certificate signing requests. Having good understanding of signing can save you lot of time later on.
The main concept in iOS signing is “provisioning profile”. It is a bundle consisting of:
- App ID (unique ID of your app)
- Set of device unique identifiers
- Developer certificate
You will end up using various provisioning profiles. You will certainly use a wildcard developer profile, which you can use to put any app on your development devices. You might need to use an ad-hoc provisioning profile if you decide to do ad-hoc distribution (e.g. for beta testing). Before submitting your app for approval, you will have to generate a distribution provisioning profile that is used to sign the app. The provisioning profiles are generated on iOS Provisioning Portal. There you also generate your certificates and register the devices, where Apple will allow you to run the debug/beta versions of your apps.
Describing the process of obtaining all keys, certificates, provisioning profiles and signing the apps would bloat this article too much. Read this tutorial for more details.
Once in a while, things might go wrong with signing. Then the iOS build tools or the device display very cryptic and/or vague error messages. If you start searching fora, you will find that there might be various causes for any of those errors and therefore multiple solutions. So there is a chance that you end up spending hours diagnosing your own flavor of the problem with signing.
Show Them the Money!
Before you app gets published, you need to pay some money to the publisher.
Apple
If you want to publish apps on the App Store, you need to purchase a subscription to iOS Developer Program. It costs US$99 or equivalent in your local currency and it expires after one year. If your apps are published on the App Store and you decide not to extend your subscription, your apps will be removed from the App Store.
Google requires a one time fee of US$25.
Publishing and App Reviews
Android
It is very simple to publish an app on Google Play Store. Upload your app, supply several assets (graphic files and descriptions) to Google Play Developer Console and your app is ready for publishing. After pressing the Publish button, it is available on Google Play Store within several hours.
App Reviews – Source of Headache for Many Developers
When your app is ready, you can upload it to iTunesConnect to append it to the end of the review queue. It usually takes about one week to get to the beginning. Before Xmas, the queue is longer because many publishers want to publish special Xmas editions of their apps (usually games) and the app review team does not scale with the length of the queue. The Apple reviewers review the app against the App Store Review Guidelines. It is strongly recommended to read the guidelines once you start considering publishing your app. If the app complies with the guidelines, it will get published on the App Store. If the reviewer finds discrepancy between the guidelines and the functionality/content/appearance of the app, the app will be rejected. The developer receives information about the reason(s) for rejection. There are two options how to proceed. Either fix the issues and upload the app for approval again, or appeal to the App Review Board. If the App Review Board agrees with the reviewer, then the issues have to be fixed. Otherwise the app will get published.
My apps were rejected several times. In general, I have to say that the reworked versions were better than the original. So there is something positive about the reviews too.
The major problem with the review process is that the feedback to the developer is often very generic and it is not quite clear what the reason for rejection is. It is even less clear what the best adjustment of the app is. The feedback usually consists of a generic part, such as the item in the App Store Review Guidelines that has been violated according to the reviewer, for example:
"2.9: Apps that are “beta”, “demo”, “trial”, or “test” versions will be rejected"
This is followed by a screenshot of the app and/or brief explanation why the app does not comply.
Violation of item 2.9 often happens when somebody first publishes a full/paid version of the app. Later he decides to publish a free version that contains limited functionality and prompts to purchase the paid app. The chance is high that the app won’t pass a review because it violates item 2.9. The best remedy in this specific case is to use In-App Purchase so that the user can unlock paid features in the free app.
So How Are My Apps Doing?
Once your app is live, you certainly want to know, how many users installed your app, from which countries, on which devices etc.
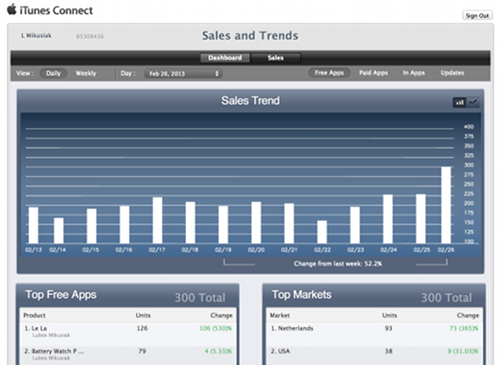
iTunesConnect
The information Apple provides to the developers about app downloads is rather "minimalistic". The data is broken down into four sections:
- Free Apps
- Paid Apps
- In App Purchases
- Updates
Within each section, you can see a graph with downloads/purchases of all apps in that group and tables with breakdown per country and per product. There is one more table that shows a breakdown per product and country. And that's it.
I would really appreciate to know more, such as:
- What percentage of my users are iPad users so that I can determine how much time I should spend on tablet-specific functionality
- Graphs with downloads per app
- Number of active users and their iOS versions so that I can determine whether to support just two last iOS versions or also some earlier versions.
Apple released iTunes Connect Mobile so that the developers can track app downloads on their iDevices. The level of information is approximately the same as in iTunesConnect on the web.
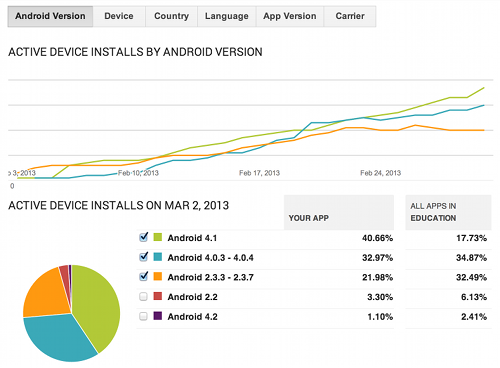
Google Play Developer Console
Google did a great job with Analytics. The analytics of Android app downloads does not fall behind. It is really elaborate. The reports are provided per app. You can obtain information about cumulative and daily installs. Very interesting information is daily uninstalls of the app (which also makes me wonder what kind of data Android devices send to Google).

Each of those reports can be further broken down by Android version, device, country, language, app version and carrier.
Concluding Remarks
iOS
iOS provides a mature SDK, with a stable API and an IDE that contains everything you need to start developing. The development is rather smooth. Signing the apps might be a headache from time to time.
There are two main sources of frustration for iOS developers. One is the app review process and possibly several iterations of changing the app functionality to satisfy the reviews. The other is that the platform is closed. Sometimes is not possible to add useful features to apps.
Android
This is a probably remains a moving target for several more years. Major changes and enhancements are added between major versions. Because there is quite some spread of active Android versions, the developers might need to implement the same functionality differently for different Android versions to provide the best user experience.
The SDK has still various child diseases. The biggest frustration for developers is the emulator. It is very slow and it is often easier to develop on devices. The SDK feels like a “kit” that developers need to assemble and tweak to their needs.
Did you find information in this article useful? Is there something essential to add? Is your experience different from mine? Please leave a comment below.