iOS vs. Android Development Comparison – Part 1
Author: Lubos Mikusiak
![]()
![]() ,
March 2013
,
March 2013
Intro
In spring 2011, I decided to start developing on iOS. Because I am a maker rather than a pure learner, I set a goal for myself to create an app that is useful for almost any iDevice user and publish it on the App Store. After about three months, Battery Watch Pro 1.0 was published on the App Store. Later I added a free version – Battery Watch Plus that includes In App Purchase.
About a year later, I published three language apps De Het, Der Die Das and Le La. These apps help users to learn and practice the grammatical articles in Dutch, German and French. De Het got pretty famous in the Netherlands. I had several radio interviews. There are Facebook posts and tweets about De Het. And, of course, I regularly received a question whether the apps are available on Android. In November 2012, I had some spare time and was ready for several weeks of exploratory learning. So I decided to port the language apps to Android. De Het for Android got published in February 2013. Der Die Das and Le La followed few weeks later.
While developing for the two major mobile platforms, I accumulated quite some knowledge and learned some lessons, which I decided to share in this article. I focus on native development – Objective C on iOS and Java on Android. To setup the right expectations, my preference is still iOS. However, I consider some aspects of Android development better.
Development Environment
You need a mobile device, a PC or a laptop, an IDE and SDK. If you just want to play around, a PC/laptop with an IDE and SDK are sufficient. If you are serious about publishing your apps, get the devices as well.
Apple and Apple
You need a Mac in order to develop for iOS. If you don't have a Mac, you'll need to purchase one and you probably won't regret it. The default IDE choice is Xcode by Apple. Part of Xcode distribution is the iOS SDK and iOS Simulator. For a long time, Xcode was the only IDE for iOS development. Since April 2011, Xcode has a competition – AppCode by JetBrains.
Android - Multiple OS Choices
You can develop for Android on Windows, Mac OS and Linux. Easiest way to start with the development is to download Android Development Tools. In a single bundle, you will get an IDE (Eclipse), Android Development Tools Plugin for Eclipse and the essential Android SDK components. If you want to use another Java IDE, such as IntelliJ, you need to download just Android SDK Tools. Use the SDK Tools to download additional packages. Then make IntelliJ aware of Android SDK location. Community Edition of IntelliJ is sufficient for Android development.
Get to Know the Platforms
iOS – Older than You Think
iOS is mature platform. Its origins in the NeXTStep system from the early 90's (if you know the iOS API, you have certainly noticed that many class names are prefixed with ‘NS’). The NeXTStep platform later progressed into Mac OS. iOS is a minified version of Mac OS. iOS receives enhancements with every new release. Porting to higher versions of iOS is usually pretty straightforward. Occasionally, behavior of existing APIs changes between versions.
Android – Moving Target
First Android alpha releases appeared in 2007. The look and feel went through quite some transformation so far. The first alpha releases were partially inspired by Blackberry. Later releases looked more like iOS. Android 3.0 seems to have taken inspiration from Windows Metro with lot of black/while spaces and sharp corners. Android 3.0 also scraped four hardware navigation buttons and replaced them with navigation bar and action bar on the touch screen. Other parts of Android go through major enhancements as well. This places extra burden on developers. If they want to offer the best user experience for recent and not so recent Android versions, they need to often write separate code each major release.
Version Distribution
Android
Google publishes the data about Android version distribution at Platform Versions. The figure below shows the distribution of Android versions in the period between 22nd January and 4th February 2013.
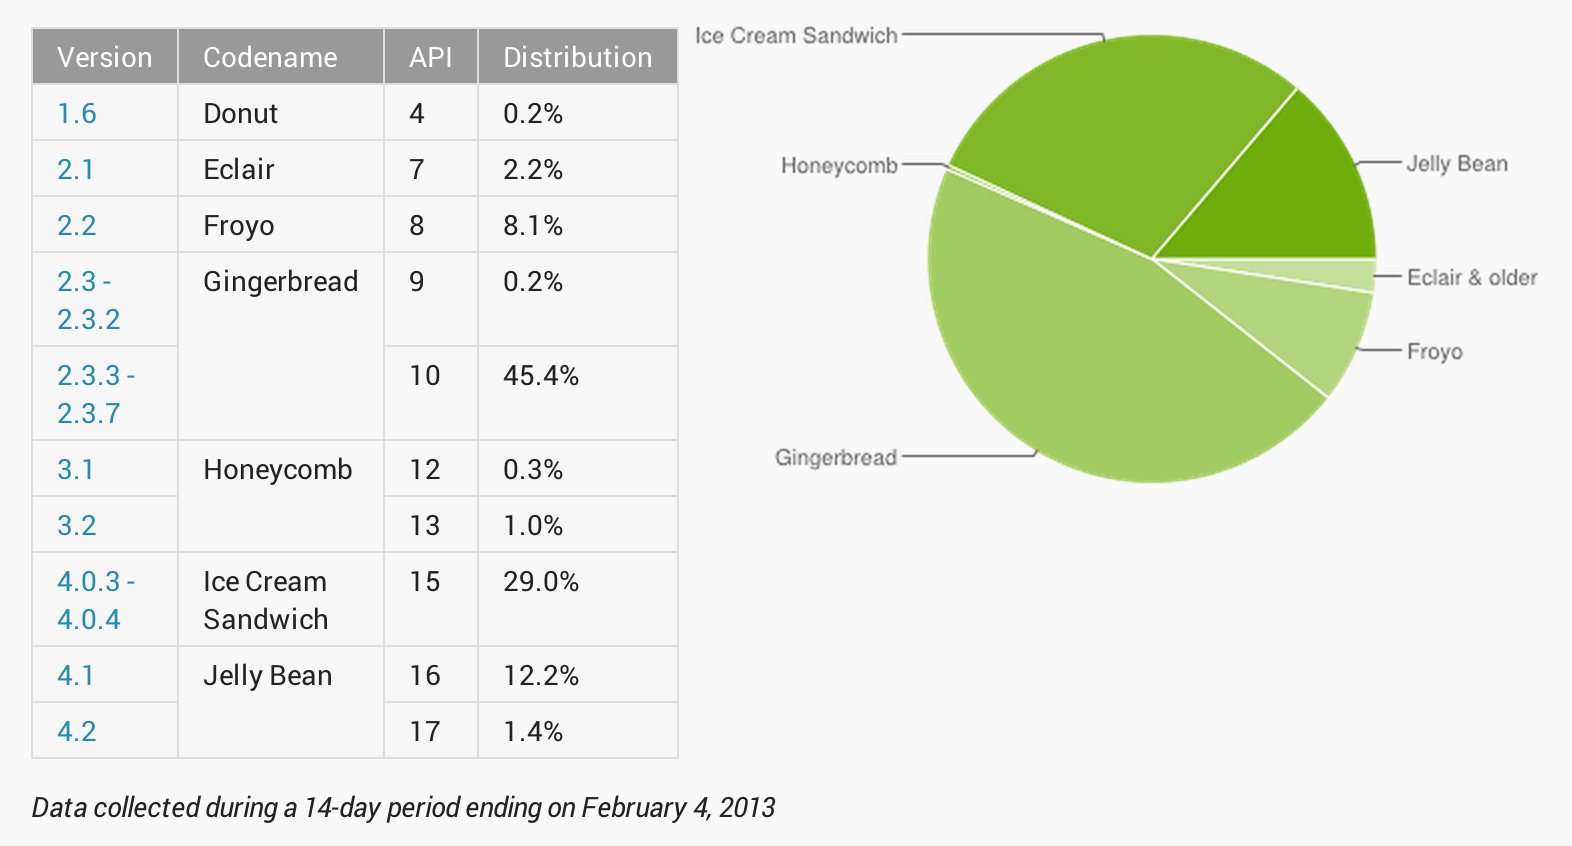
In this period, still more than half of Android users own devices with Android 2.x. What contributes to this situation? Each device manufacturer has to release their own Android upgrade. If mobile operators install Android on the devices, they also need to provide an upgrade, which sometimes does not happen or it happens late. Android OS upgrades go sometimes wrong. Many Android users are generally reluctant to upgrade.
What does it mean for an Android developer? Be prepared to support a wide range of Android versions (in addition to wide range of devices). On the other hand, the overall Android version distribution is different from the distribution of Android versions with most installed apps. Users with newer devices are more likely to download apps. For my apps in March 2013, more than 75% of installations were done on devices with Android 4.x although these devices have about 33% overall market share. So ditching support for older Android versions can often happen sooner than what the overall Android version distribution implies.
iOS
Apple does not publish any data about the distribution of iOS versions. There are others, which publish such data based on various input data at their disposal (see, for example, iOS Version Stats). Rule of thumb is that about 80% of the users are on the two latest versions of iOS.
What does this mean for an iOS developer? Targeting the last two iOS versions covers about 80% of potential users of your apps. Unless you have published an app that is used by millions of users, you do not need to worry about supporting earlier versions of iOS.
Get to Know the Hardware
iPhone
The original iPhone shipped with 412MHz ARM CPU, 128MB RAM and minimum 4GB of flash memory. iPhone 5 has a dual-core 1.3GHz Apple A6 CPU, 1GB RAM and minimum 16GB of flash memory. When developing for iOS, you notice that the memory size is usually not a limitation. You can open many different views in your app and they will stay in the memory no matter whether visible or not. iOS starts purging the memory only once the whole RAM gets full (usually after playing a game with lot of memory leaks).
A GPU with OpenGL support was present already in the original iPhone, which means that animations could take advantage of OpenGL. That is the reason why animations on iPhone were always quick and smooth.
Android devices
The original requirements for Android devices in 2008 were as follows: 200MHz CPU, 32MB RAM and 32MB of flash memory. Minimum requirements for Android 3.0 and above are 1GHZ CPU, 256MB RAM and 512MB of flash memory. Although the hardware requirements increased significantly, Android still behaves as if the memory limitations from 2008 still existed. It limits the amount of data, which the apps can hold in the memory. When a view becomes invisible, Android will deallocate all UI elements from the memory. Next time the view is shown, the UI elements get recreated again. One of the consequences for a developer is that for many views some code needs to be written to restore the state when the view becomes visible for second, third, etc. time.
Since OpenGL was not a hardware requirement from the beginning, the animations on Android devices are calculated by the CPU, which makes them slow and stuttering.
Emulator vs. Simulator
Android Emulator – Still Long Way to Go
The Android Emulator is a virtual machine that runs on the host computer. Emulators are available on Windows, Mac OS and Linux. Emulator is both good news and not so good news. The good news is that the same binary runs both on the emulator and on Android devices. Not so good news is that the emulator is very slow because it provides dynamic binary translation of device machine code to the OS and processor architecture of your development machine. In other words, each CPU instruction executed by the emulator needs to be translated into instruction(s) of the CPU of the host computer.
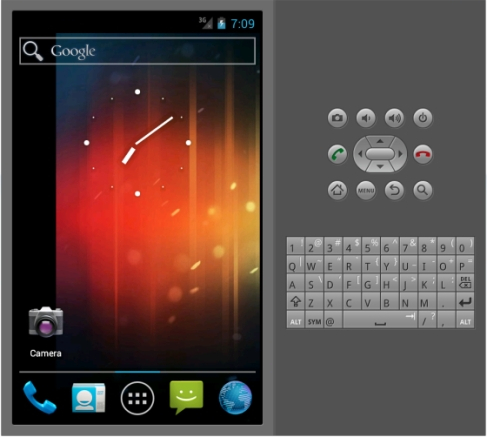
Most of the customization of the emulator is done via command line using the emulator console. You connect to the console using telnet. Then you can configure the network settings, simulate voice calls and SMS’s, send GPS coordinates, etc. There is also a rich set of keyboard shortcuts, which trigger various events in the emulator, such as dial, hangup, audio up/down, take photo etc. Rotation is invoked using Ctrl+F11 and Ctrl+F12.
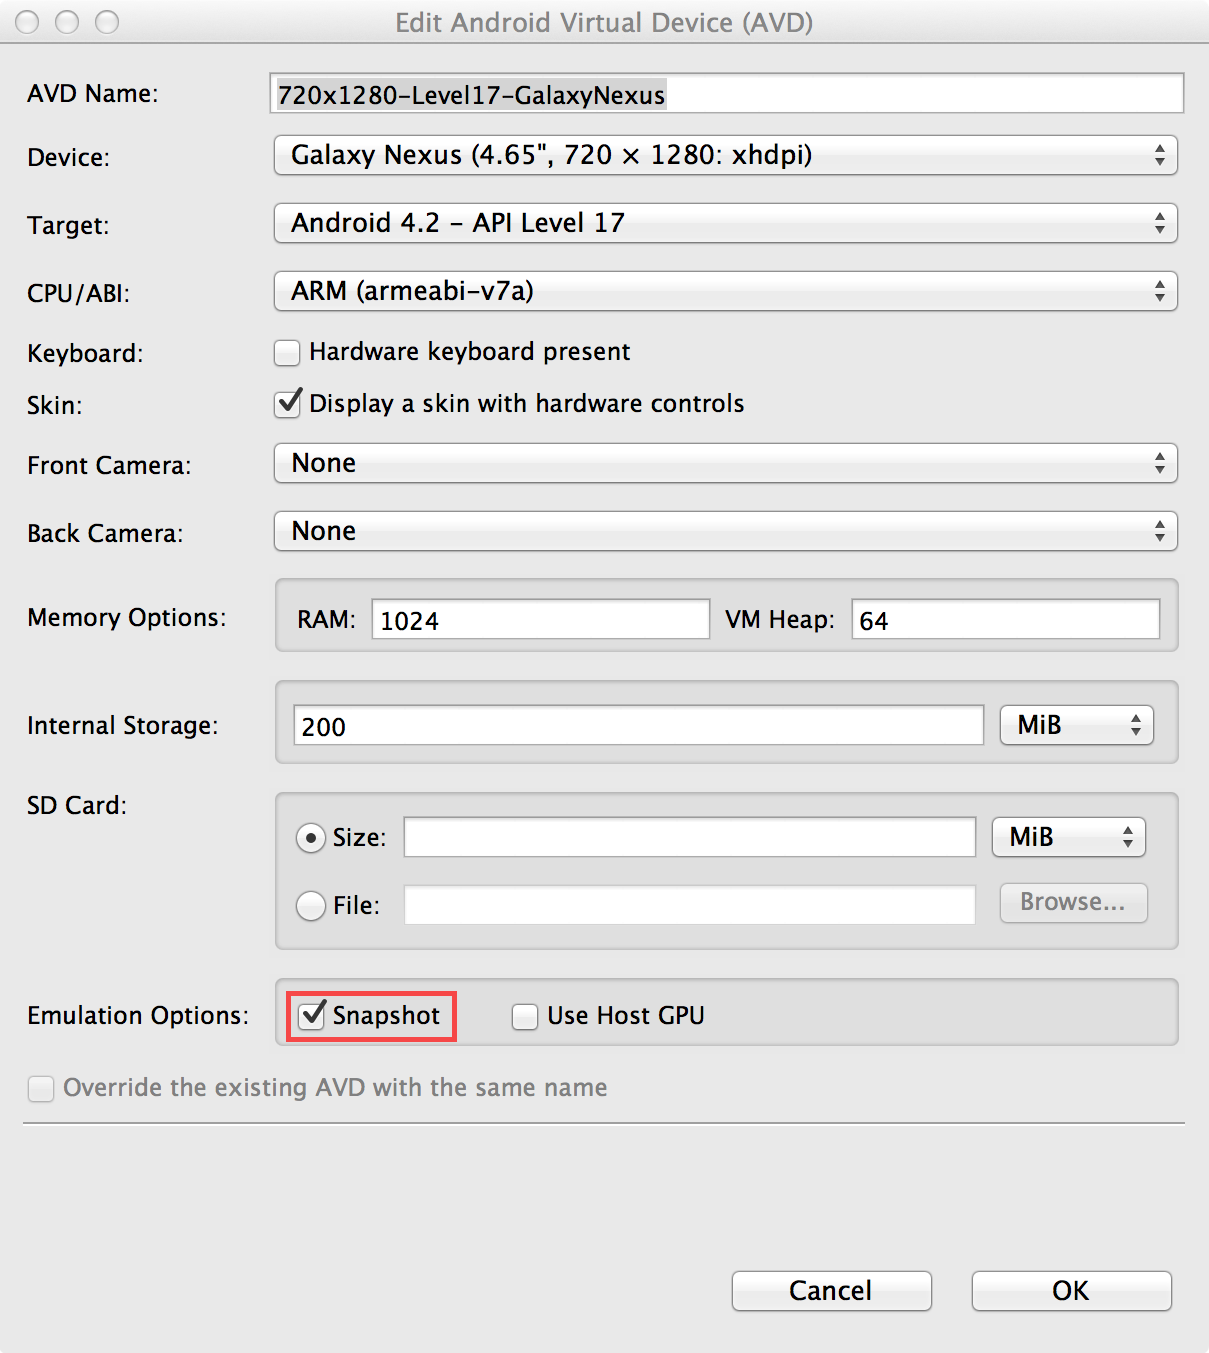
Every time you start the emulator, the booting of the device takes place. Based on your CPU speed, this takes between 1 and 5 minutes. This can be sometimes really annoying. For example, if the emulator crashes in the middle of a long debug session or when the SDK randomly decides that the new instance of the emulator has to be started. To improve this shortcoming, it is possible to select the option to save memory snapshots when you create Android virtual devices on your development computer. But do not cheer up too much. Sometimes the emulator decides it cannot load the memory snapshot. So you need to boot the device again.
Android documentation recommends installing the virtual machine acceleration so that Intel-based Android virtual devices can take advantage of CPU virtualization extensions. The documentation mentions that this is an experimental feature. I tried to install it on my Mac Book Pro. My Mac OS crashed and rebooted while starting an Intel-based Android virtual device. So uninstall.sh was the only option. But looking forward to enhancements of the CPU virtualization extensions in the future.
Because of these quirks, many Android developers decided to bypass the emulator and debug their code directly on Android devices.
iOS Simulator – Smooth Experience
The iOS Simulator is delivered together with Xcode. It can simulate both iPhone and iPad. Each Xcode release contains iOS SDK for the current version and one version before. Previous iOS SDK versions can be downloaded. The simulator runs out of the box, no tweaking of the settings is usually necessary.
Xcode compiles the simulated apps for the Intel chipset. This is both good news and not so good news. The good news is that the simulated apps are fast. They are a special kind of desktop apps, which run within the simulator container. The not so good news is that the simulator apps are different binaries from the apps compiled for iDevice CPU (ARM). Apple recommends using the simulator as a preliminary testing tool to speed up the development and not as a replacement of the testing on the device. Personally, I found few bugs on the device, which I did not detect on the simulator.
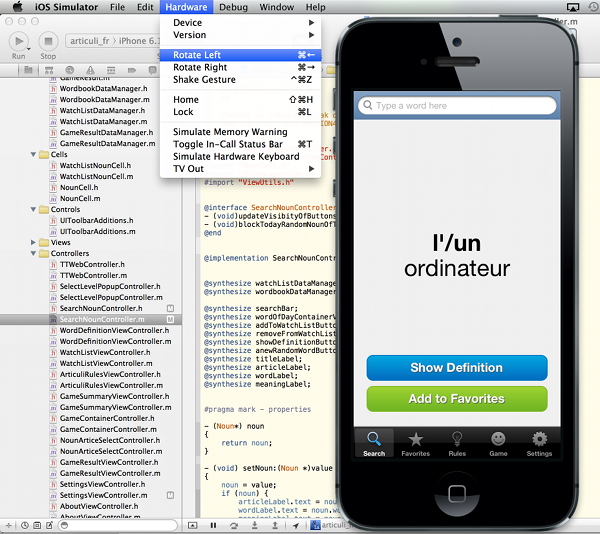
It is possible to simulate changes to the orientation of the device (portrait or landscape) and the shake gesture. You can change the screen resolution (retina or pre-retina) and switch between iPhone and iPad. You can also take screenshots of the simulator screen and upload them to iTunesConnect without any resizing. The location (latitude, longitude) can be sent to the apps. All this functionality is available from the simulator menu.
Part 1 is rather high level. In part 2 you will learn what you can expect when you decide to get your hands dirty with development and try to publish your apps.
Did you find information in this article useful? Is there something essential to add? Is your experience different from mine? Please leave a comment below.